TL-WR703N with Openwrt patches njit-client
Background
At my campus, the network server center offers us users to use a H3C client to dial to connect to the internet, which can add some limitations for each account. The aim of this scheme is to bind a user with a specific Mac address, so it seems not possible for us to share someone’s account. However, in my lab, we need to make an internet access interface for nearly 30 persons. In the past, I set up a dual network interface cards (NIC) to share the account to a switchboard, which auto dispatch Ips to the client PC. That has been worked good except for the high power consume of the host PC, and once there is any problem with the host, we are all cut off the internet. someday, I saw a blog said OpenWRT can offer some tricks to crack this situation. And I was so exited to buy a new TP-Link WR703N 3G router to have a test. The main reference is the docs on official OpenWrt, where you can find a description of WR703N . I record the crack process as below.
Prepare list
- TP-Link WR703N (of course the main device)
- a computer with internet access and have a wifi interface
sshtools (SecureCRT and WinScp for Windows)- maybe a USB stick if you want to chroot to expand the storage space
Update with OpenWrt
Watch out!!
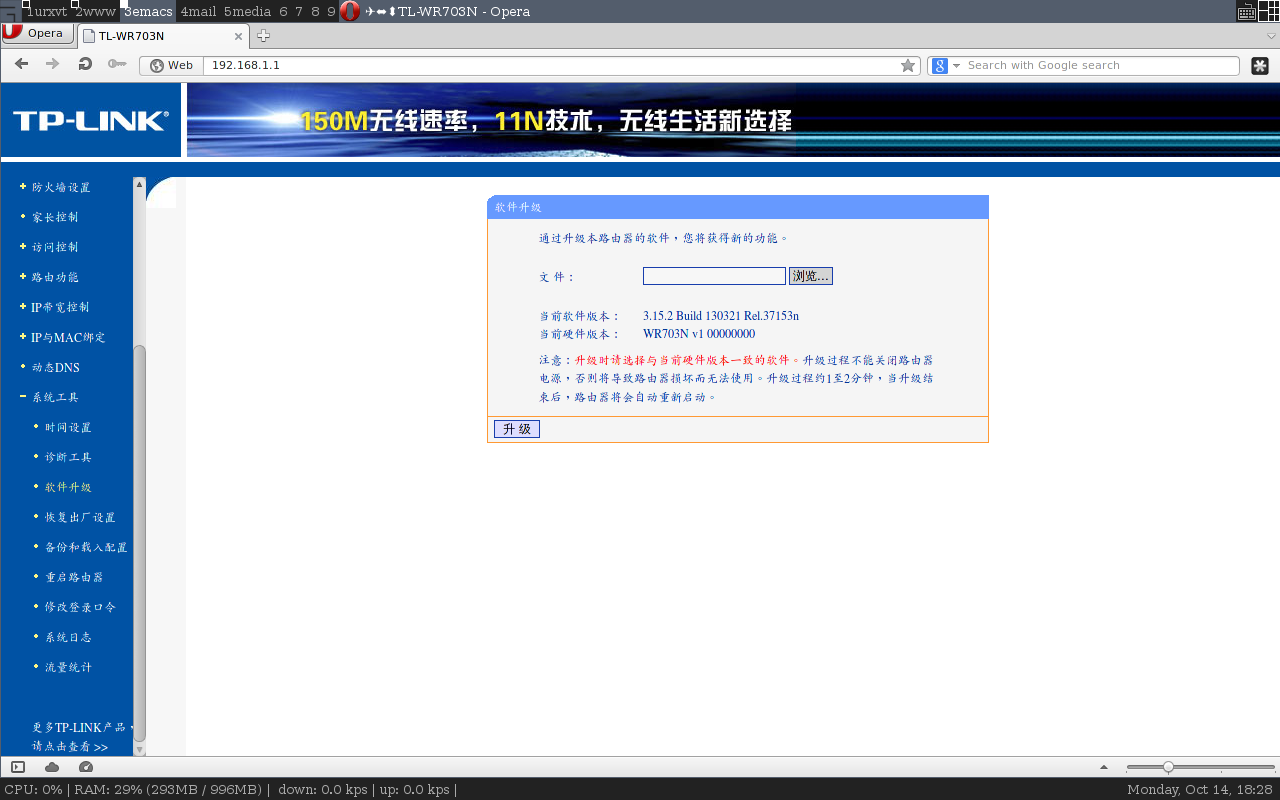
Be careful to check the version of your router, and download the right firmware from OpenWrt’s repository. DO NOT CHECK THE VERSION ON THE EXTERNAL INFORMATION ON THE STICKER. You need to login the original web UI interface to check that. Connect the router with your computer by a wire and type 192.168.1.1 in any web browser’s address bar, by default input admin and you can enter the Tp-Link default web UI, find the update item at the left list, then you can find the information about the device as shown in the below figure.
Input the firmware you download from OpenWrt, and click update, it will be OK for one minute or so.
When the blue led keep stable, again type 192.168.1.1 in the browser and you will get this:
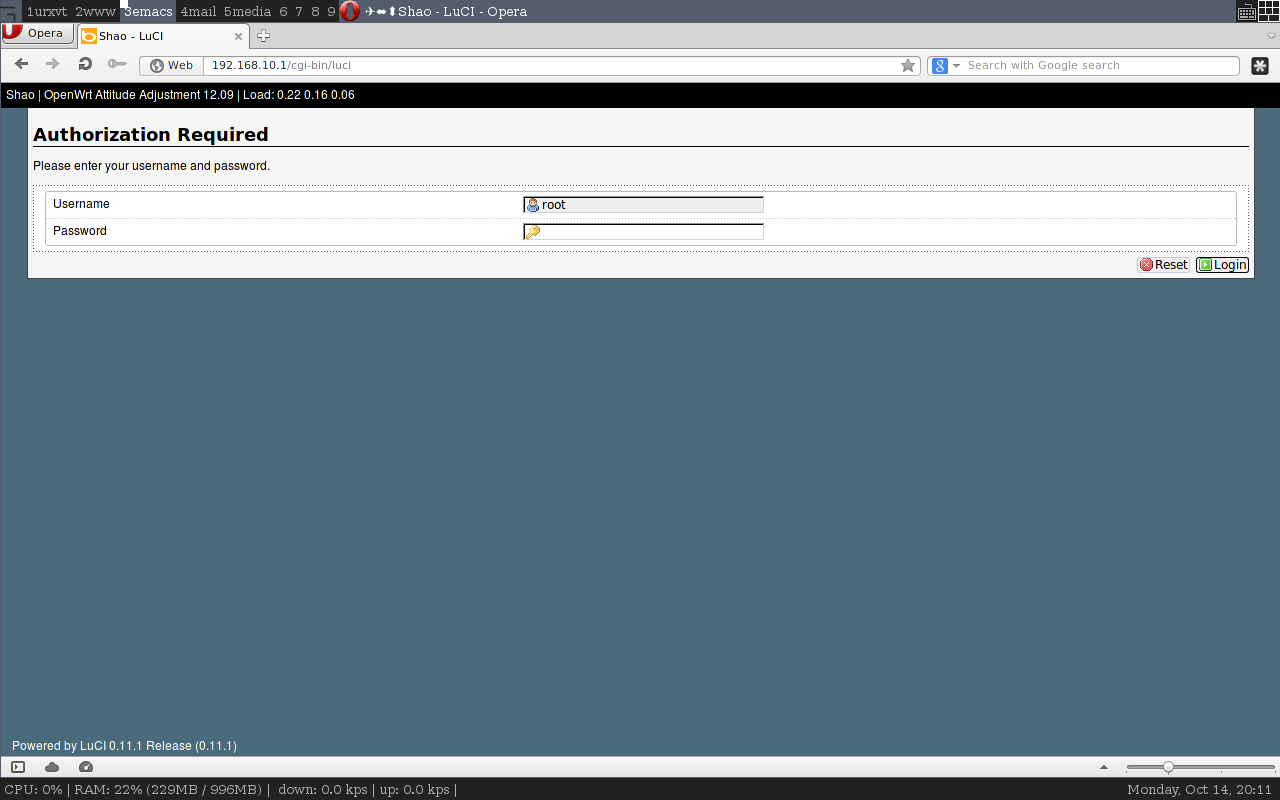
Ok, you can now configure your new linux-based router system through the web UI interface (called Luci). You are firstly recommend to set the root password. Now explore the various tabs in Luci.
Configure for njit-client
Since my purpose is to install njit-client for my H3C network, so there are some special configurations. First, you can check the free memory space of the system now. At Luci’s System--Software menu, all the installed packages are list and you can see there are only about 800k free space left. That’s is not enough for njit-client’s installation. So I choose to remove some of the package: ppp, pppoe and kmod-ppp. Then perform a reboot to clear the removed packages space.
Then, use ssh to login you device in a terminal, modify the /etc/config/network and /etc/config/wifi to enable the wifi interface and setup the wlan and lan interfaces. The final set is list below:/etc/config/network
config interface 'loopback'
option ifname 'lo'
option proto 'static'
option ipaddr '127.0.0.1'
option netmask '255.0.0.0'

config interface 'wan'
option ifname 'eth0'
option _orig_ifname 'eth0'
option _orig_bridge 'false'
option proto 'dhcp'

config interface 'lan'
option type 'bridge'
option proto 'static'
option ipaddr '192.168.1.1'
option netmask '255.255.255.0'
/etc/config/wifi
config wifi-device 'radio0'
option type 'mac80211'
option channel '3'
option macaddr '14:e6:e4:e7:c6:a2'
option hwmode '11ng'
option htmode 'HT20'
option disabled '0'
option txpower '27'
option country 'US'

config wifi-iface
option device 'radio0'
option network 'lan'
option mode 'ap'
option ssid 'Your own wifi name'
option encryption 'psk2'
option key 'Your own password'
After that, reboot your device and you can use a computer with wireless card to connect your router device.
Next step, download the njit-client package from here . Transfer the package to the /tmp directory by scp or WinSCP on you device. Then use ssh tool to login with root into your OpenWrt system, execute the commands below:
okpg update
okpg install /tmp/njit*
Then the njit-client will be installed on your system, it will automatically download some dependencies. Finally, a complement command will show up and you can now test the client by input njit-client user_name password to check its efficiency. Generally, it will go wrong because of the depended libraries. So we need to link some libs to fix that. Type the commands below:
cd /usr/lib
ln -s libcrypto.so.1.0.0 libcrypto.so.0.9.8
ln -s libpcap.so.1.1.1 libpcap.so.1.0
And then, check it again, if there is none error, congratulations, it’s OK.
I don’k think it is bearable to run the command each time I want to connect to the internet, so I need a auto start up script. According to OpenWrt’s start up sequence with init.d service, just create a new script such as xclient and input the codes below:
1 | #!/bin/sh /etc/rc.common |
The last step is to chmod +x xclient .
Jobs done!